0
Your Cart


Product title goes here
$19.95
Thank you! Your submission has been received!
Oops! Something went wrong while submitting the form.
There are no items in your cart. You should really do something about that.

Some asshat named Todd posted a decree on one of our social media pages that premium cables are all a sham and cheaper cables work just fine. The animated .gif pretty much sums up my reaction. I hate to break it to you, Todd in Ohio, but you are just wrong.
So, what is the difference between a cheap cable and a premium cable? I often get this question and the answer is at the core of why this company exists. So let’s dive in.

Fig. 1 is a picture of a 10 ft. instrument cable I purchased at a big chain music store for about $20. When compared to our cables, the most glaring difference is the copper outer-shield that wraps around the conductor. The purpose of an outer-shield is to block external signal interference, but this one is only made up of a small number of wound copper wires that cover less than 70 percent of the total surface area. Copper is expensive – especially these days. Using less of it (and cutting other corners) reduces the cost of manufacturing a cable, but that comes at a much greater cost of sacrificing sound clarity and tone.
And while this cable does have a PVC inner-shield around the insulation layer, it (along with the outer-shield) is not enough to adequately insulate the conductor wire.
Each of these elements can impact a cable’s capacitance, which affects the signal level. With higher frequencies, higher capacitance cables can create signal loss – particularly for higher impedance instruments like guitars. In general, cables that include more copper and more insulation offer lower resistance and less signal loss over a given distance. Thicker inner copper conductors (18-20 AWG) for instrument cables can also provide a richer low frequency response.
The good folks at Sweetwater.com have a blog post on this:
“Lower cable capacitance allows more of the natural ‘brightness,’ ‘presence,’ or ‘bite’ of an instrument to reach the amp, which in turn allows the treble controls to be run lower, reducing hiss and other unwanted noise. High frequency loss from the cable gradually becomes audible and objectionable depending on the source, the amplification and other circumstances…Raising the source impedance or increasing the length of the cable increases the loss. Guitars typically have much higher source impedances at higher frequencies because of the inductive nature of their pickups, which aggravates the effect of cable capacitance.”
Capacitance is measured in pF/ft (picofarads per foot). The lower the capacitance the better the cable performance. Most premium cables run between 20-40 pF/ft. I’m not sure what the capacitance is for this cable (fig.1), but based on what I explained above, we can assume it’s way higher.
With higher capacitance cables – especially longer ones – guitars will sound “muddier” and lose clarity. That affects your tone. And you don’t want that.
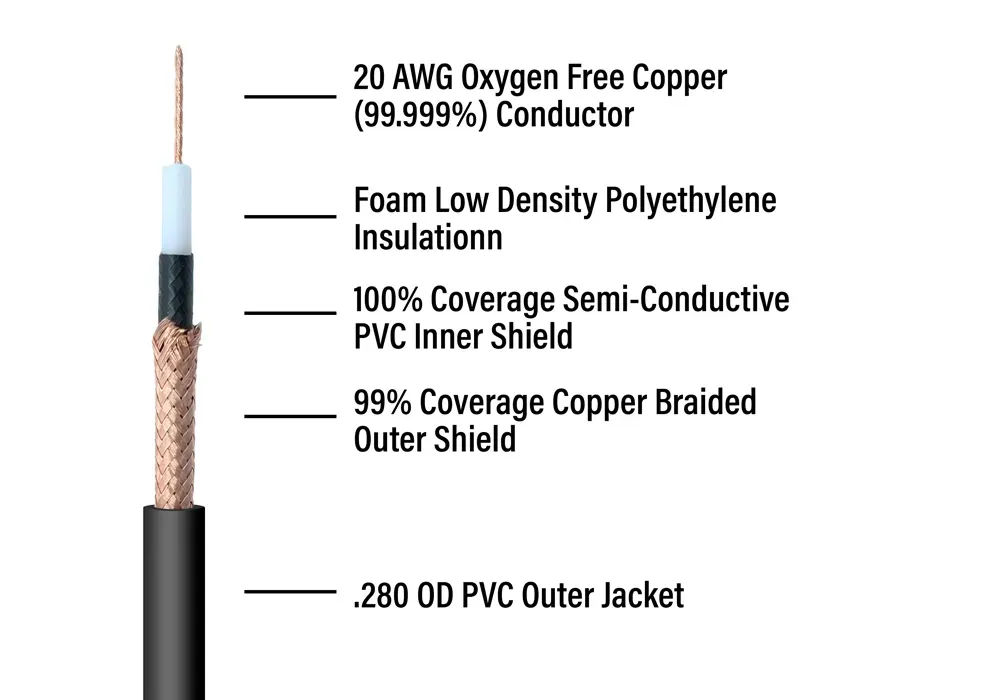
Comparatively, premium cables offer a super lower capacitance by not skimping on insulation or copper at any layer (see Fig. 2).
Other premium cable manufacturers implement different features into their designs. For example, one company uses braided hollow conductors, another applies an enamel coating to the conductor’s individual strands, and another offers directional cables based on the microscopic grain structure of the conductor), but those cables also retail for 2x-3x more than our cables. And (as I’ve stated before) at some point, the law of diminishing returns kicks in and any improvement in audio quality or clarity becomes unnoticeable to the human ear.
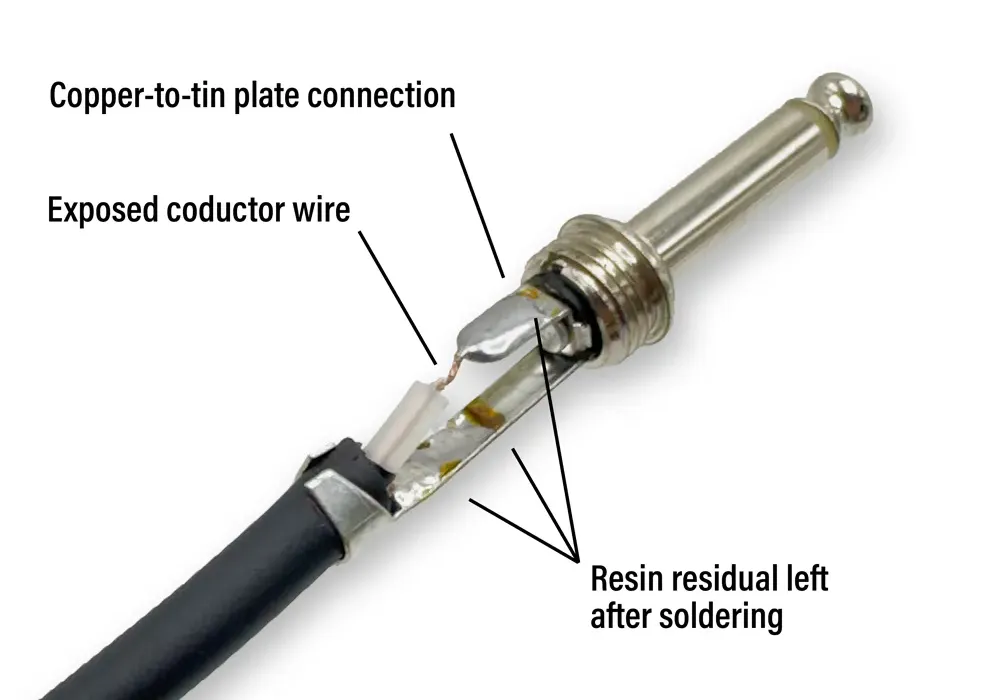
The second component of an instrument cable are the plugs on each end. The plug itself, and the way conductor and shield are soldered to it, can greatly impact your tone as well as the overall quality and lifespan of the assembled cable. Plugs are also the most likely point of failure with any cable. Fig. 3 (heat shrink removed) is the same $20 cable with a basic instrument plug. You’ll see resin deposits on the connections leftover from the soldering process, which can easily be removed with isopropyl alcohol, but this step is often eliminated in mass production processes. Additionally, the conductor wire is exposed before the solder connection on the tin plate – that’s a big no no.
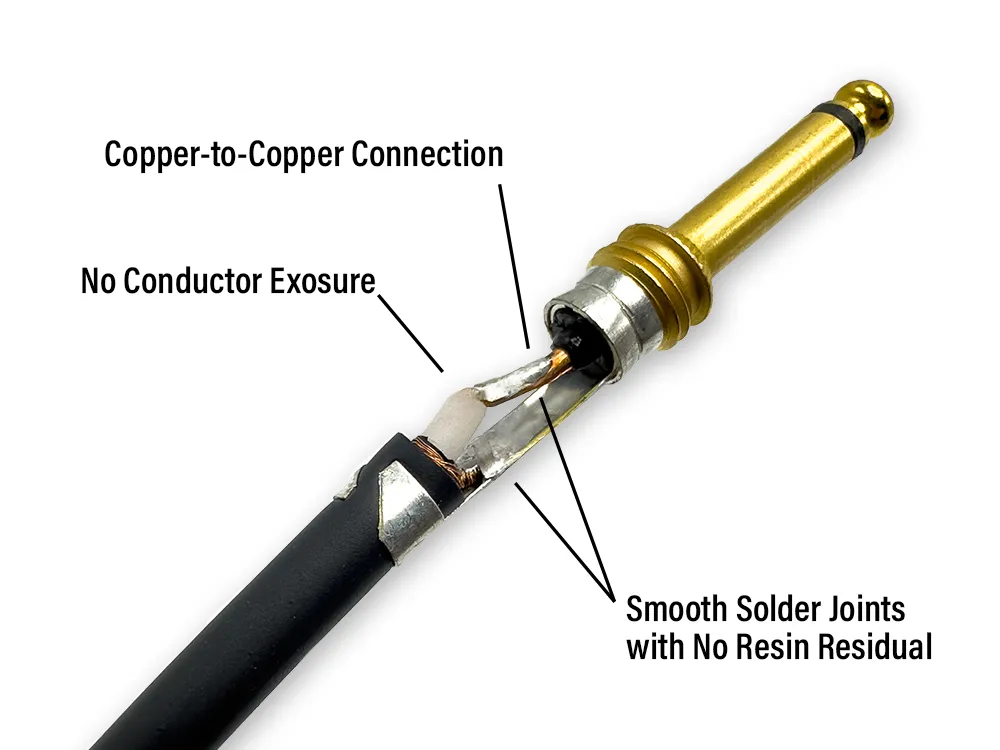
The tin plate is very common with instrument plugs and are fine to use, but we found the G&H High Clarity Copper Core Plug provides greater clarity in higher frequencies and tighter (but still warm) lows. These plugs eliminate the traditional tin plate where the cable is typically soldered. Instead, it uses a copper pin that shoots directly into the plug. This creates a cleaner, copper-to-copper connection between the cable and the plug. See Fig.4 (heat shrink removed).
We implement a few other secret techniques to ensure the cleanest and strongest connections that can stand the harshest elements of touring.
So, Todd, I ask you: When you’re on stage and your amp is pumping out a bunch of interference noise or – even worse – your cable has shorted out, you’ve got no sound at all, and your bandmates and everyone at the gig are staring you down while you’re frantically trying to figure out the problem, what kind of cables would you rather have connecting your gear?
